Quantcast
Channel: SCN : Blog List - Web Dynpro ABAP
Viewing all 107 articles
Browse latest View live

Code Snippet Series: Determining the Client Environment

$
0
0

This post is part of a series on code snippets. The complete list of posts in the series is available in the document Code Snippets: A Blog Series.


Knowing the environment in which a Web Dynpro ABAP application is running is necessary if you want to branch logic or show or hide content depending on the client environment. An example is showing the user's logon name in a header or a copyright notice in a footer when the application is running standalone but hiding these view elements when the application is running in the NetWeaver portal.


   DATA lo_wd_component TYPE REF TO if_wd_component.   DATA lo_wd_application TYPE REF TO if_wd_application.   DATA lv_client_environment TYPE i.   lo_wd_component ?= wd_this->wd_get_api( ).   lo_wd_application = lo_wd_component->get_application( ).   lv_client_environment = lo_wd_application->get_client_environment( ).   CASE lv_client_environment.       WHEN if_wd_application=>co_client_environment-nwbc.
 *     NetWeaver Business Client       WHEN if_wd_application=>co_client_environment-portal.
 *     NetWeaver Portal       WHEN if_wd_application=>co_client_environment-sapgui.
 *     SAPgui       WHEN if_wd_application=>co_client_environment-standalone.
 *     Standalone       WHEN if_wd_application=>co_client_environment-unknown.
 *     Unknown client environment   ENDCASE.


If you are on a version of NetWeaver that supports chaining method calls (NW 7.0 EhP 2 or higher), you may skip declaration of the object references.


   CASE wd_this->wd_get_api( )->get_application( )->get_client_environment( ).       ...   ENDCASE.


Code Snippet Series: Creating Menu Items Dynamically

$
0
0

This post is part of a series on code snippets. The complete list of posts in the series is available in the document Code Snippets: A Blog Series.


In a view's layout, individual MenuItems may be added as child elements to a Menu, ButtonChoice or LinkChoice parent element, but what if the list of menu options is not known at design time? An example is needing to present the user with a ButtonChoice that lists employees who report directly to the user. This list will be different for each user and must be read from a database table, so these menu options cannot be created at design time.


The Menu, ButtonChoice or LinkChoice element may be created in the view's layout at design time and its child elements created dynamically at runtime, for example in the view's WDDOINIT hook method. The example below creates MenuActionItems for a ButtonChoice. The same approach may be used to dynamically create menu items for a Menu or LinkChoice UI element.


   DATA lo_view TYPE REF TO if_wd_view.   DATA lo_buttonchoice TYPE REF TO cl_wd_button_choice.   DATA lo_menuactionitem TYPE REF TO cl_wd_menu_action_item.
 * Get a reference to the ButtonChoice view object   lo_view ?= wd_this->wd_get_api( ).   lo_buttonchoice ?= lo_view->get_element( 'BUTTONCHOICE_ID' ).
 * Add a MenuActionItem to the ButtonChoice for each record in the source data table   LOOP AT lt_data ASSIGNING <data>.       CALL METHOD cl_wd_menu_action_item=>new_menu_action_item           EXPORTING               id               = <data>-id               on_action = 'VIEW_ACTION'   " action to be executed upon selection of the menu item               text            = <data>-text           RECEIVING               control   = lo_menuactionitem.       CALL METHOD lo_buttonchoice->add_choice           EXPORTING               the_choice = lo_menuactionitem.   ENDLOOP. " <data>

Code Snippet Series: Passing Parameters to Web Dynpro from SAPgui

$
0
0

This post is part of a series on code snippets. The complete list of posts in the series is available in the document Code Snippets: A Blog Series.


Two steps are needed to pass parameters into a Web Dynpro ABAP application from the SAPgui. First, the SAPgui must construct the URL of the Web Dynpro application and open the URL in a web browser. This step may be done in any ABAP routine.


   DATA lv_absolute_url TYPE string.   DATA lv_url                TYPE char255.   DATA ls_parameter    TYPE ihttpnvp.   DATA lt_parameters   TYPE tihttpnvp.
 * Assemble the parameter name/value pairs as needed   ls_parameter-name  = 'param1_name'.   ls_parameter-value  = 'param1_value'.   APPEND ls_parameter TO lt_parameters.   ls_parameter-name  = 'param2_name'.   ls_parameter-value  = 'param2_value'.   APPEND ls_parameter TO lt_parameters.
 * Construct the URL with parameters   cl_wd_utilities=>construct_wd_url(       EXPORTING           application_name = 'WEB_DYNPRO_APPLICATION_NAME'           in_parameters      = lt_parameters       IMPORTING           out_absolute_ur l = lv_absolute_url   ).   lv_url = lv_absolute_url. " cast data type   CALL FUNCTION 'CALL_BROWSER'       EXPORTING           url                    = lv_url           window_name = 'Example: Passing Parameters'           new_window   = abap_true       EXCEPTIONS           OTHERS        = 0.


Second, the Web Dynpro application must read the parameters from its URL query string. This step must be done in the HANDLEDEFAULT event handler method of the Web Dynpro application's interface view, i.e., its window.


   DATA lt_parameters TYPE tihttpnvp.
* Read URL parameters from the query string   wdevent->get_data(       EXPORTING           name =  if_wd_application=>all_url_parameters       IMPORTING           value = lt_parameters    ).


Internal table LT_PARAMETERS may now be read and the parameter name/value pairs processed as needed by the application.

Upload/Read .xlsx file in SAP Web Dynpro

$
0
0

This document explains how to read contents from .xlsx file. It explains reading file contents from .xlsx file by code snippets. Following are the steps explaining the procedure:-

  1. Define a Web Dynpro component with name for example ‘ZZDEV_WD_TEST’.
  2. Define File Upload UI element and a Button UI element in the main view.browse.jpg
  3. Create context node with attributes FILENAME (string), FILETYPE (string), FILECONTENTS (xstring).context.jpg
  4. Bind these to the File Upload UI element. Bind FILECONTENTS to DATA attribute, FILENAME to FILENAME attribute and FILETYPE to MIMETYPE attribute.binding.jpg
  5. Browse the .xlsx file and click on upload button.
  6. On action of upload button read the context node defined in step 3.
  7. Follow below code to read the browsed .xlsx file.

* Internal tables declaration

  DATA:

        lt_worksheets                             TYPE STANDARD TABLE OF string,

        lt_contents                                 TYPE string_table,

        lt_final_contents                          TYPE <target structure table type>.


* Structures declarations

  DATA:

        ls_return                                      TYPE bapiret1,

        ls_contents                                  TYPE <target structure>,

        ls_file_upload                               TYPE wd_this->element_file_upload.


* Local variables declaration

  DATA:

        lv_name                                       TYPE string,

        lv_string                                       TYPE string,

        lv_msg                                         TYPE string,

        lv_flag                                          TYPE boolean,

        lv_message                                  TYPE string.


* References declarations

  DATA:

        lref_excel                                     TYPE REF TO cl_fdt_xl_spreadsheet,

        lref_excel_core                             TYPE REF TO cx_fdt_excel_core,

        lref_data                                       TYPE REF TO data,

        lref_dref                                        TYPE REF TO data,

        lo_nd_file_upload                          TYPE REF TO if_wd_context_node,

        lo_el_file_upload                           TYPE REF TO if_wd_context_element.


* Field symbols declarations

  FIELD-SYMBOLS:

        <fs_table>                                  TYPE table,

        <fs_data>                                   TYPE any,

        <fs_data_str>                              TYPE any,

        <fs_comp>                                 TYPE any,

        <fs_output>                                TYPE string.


* navigate from <CONTEXT> to <FILE_UPLOAD> via lead selection

   lo_nd_file_upload = wd_context->get_child_node( name = wd_this->wdctx_file_upload ).


* get element via lead selection

   lo_el_file_upload = lo_nd_file_upload->get_element( ).


* get all declared attributes

   lo_el_file_upload->get_static_attributes(

     IMPORTING

       static_attributes = ls_file_upload ).


  TRY.

*     Create object of class to read .xlsx file contents

      CREATE OBJECT lref_excel

        EXPORTING

          document_name = ls_file_upload-filename

          xdocument         = ls_file_upload-filecontents.


    CATCH cx_fdt_excel_core INTO lref_excel_core.

      CLEAR lv_msg.


*     Call method to get error message text

      CALL METHOD lref_excel_core->if_message~get_text

        RECEIVING

          result = lv_msg.

*<< Display error message returned in lv_msg >>

      RETURN.


  ENDTRY.


* Call method to get list of worksheets in the .xlsx file

lref_excel->if_fdt_doc_spreadsheet~get_worksheet_names(

    IMPORTING

      worksheet_names = lt_worksheets ).


* Condition to check whether .xlsx file has any active worksheets

  IF lt_worksheets IS NOT INITIAL.

*   Read active worksheet

    READ TABLE lt_worksheets INDEX 1 INTO lv_ws_name.

  ELSE.

*<< Display error message >>

    RETURN.


  ENDIF.


* Get reference of .xlsx file contents in the active worksheet

  lref_data = lref_excel->if_fdt_doc_spreadsheet~get_itab_from_worksheet( lv_name).


* Fetch all records in the active worksheet

  ASSIGN lref_data->* TO <fs_table>.


* Prepare exporting table with .xlsx file contents

  IF <fs_table> IS NOT ASSIGNED.

*<< Display error message >>

    RETURN.

  ENDIF.


* Loop dynamic table to prepare final table contents to pass in exporting parameter

  LOOP AT <fs_table> ASSIGNING <fs_data>.

*   Initialize flag

    lv_flag = abap_true.


    WHILE lv_flag = abap_true.

*     Read columnwise entries

      ASSIGN COMPONENT sy-index OF STRUCTURE <fs_data> TO <fs_comp>.

      IF <fs_comp> IS NOT ASSIGNED.

        lv_flag = abap_false.

*       Exit the loop when a row ends

        EXIT.

      ELSE.

*       Concatenate each cell data in a row into string seperated by '||'

        CONCATENATE lv_string <fs_comp> INTO lv_string SEPARATED BY '||'.


      ENDIF.


*     Unassign field symbol

      UNASSIGN <fs_comp>.


    ENDWHILE.


*   Shift final string having a row left by 2 places to remove leading '||'

    SHIFT lv_string LEFT BY 2 PLACES.


*   Append prepared row data to exporting parameter

    APPEND lv_string TO lt_contents.


*   Clear variable having row data

    CLEAR lv_string.


  ENDLOOP.


*   Loop internal table to split records and fill in target internal table

    LOOP AT lt_contents ASSIGNING <fs_output>.

*     Split file contents returned at '||'

      SPLIT <fs_output>

        AT '||'      

        INTO ls_contents-col1

    ls_contents-col2

    ls_contents-col3……..

*     Append split records in internal table

      APPEND ls_contents TO lt_final_contents.


    ENDLOOP.


   7. Contents will be appended to internal table LT_FINAL_CONTENTS. Define a structure in SE11 with fields corresponding to upload file structure and declare                           LS_CONTENTS of this type. Define a table type in SE11 with this structure and declare LT_FINAL_CONTENTS of this type.

   8. Finally LT_FINAL_CONTENTS will have all the records present in the browsed .xlsx file.


Hope this solves reading file contents from .xlsx file.

Build a Simple Web Dynpro ABAP Application, Web Dynpro Event Handling, Context Menu (PART 5)

$
0
0


This tutorial shows how to create a context menu, how to assign it to a part of the View, in our case to the table. It also shows how to raise a Web Dynpro Event and how to handle it.

Build a Simple Web Dynpro ABAP ,Config Controller, Component, Application Configuration (PART 6)

$
0
0


This tutorial shows how to create a Custom Controller, than change it to a Configuration Controller, Create a Component Configuration, than create a Application Configuration, assign the Component Configuration to the Application Configuration. Last step, assign the Application Configuration to the Web Dynpro Application. This way you make modifications that are visible to all users.

Build a Simple Web Dynpro ABAP, Data Node Binding,Table Binding (PART 7)

$
0
0


This tutorial shows how you can fill data in the Component Controller, which is like a global place, where you can transport the data and to use it in another Views. Also do a Binding Table and fill the table with data from the Context Node which has a Cardinality from 0..n.

Build a Simple Web Dynpro ABAP, OTR Internationalization, DropDown (PART 8)

$
0
0


This tutorial shows how you can translate a text in Web Dynpro if you don't use a text from a Text Element from the Assistance Class. It also shows how you can create your own Value Help dynamic at Runtime which are bind to a DropDownByKey


Build a Simple Web Dynpro ABAP Application, OVS Object Value Selector (PART 10)

$
0
0


This tutorial shows how you can use the Object Value Selector Component. This helps you when you want to rewrite the F4 Value Help of a field, or you just want to create a F4 Help for a field.

Build a Simple Web Dynpro ABAP Application, Web Dynpro Dynamic Programming (PART 13)

$
0
0


This tutorial shows how you can create dynamically a node and also a table. It is also shown how you can bind the table with the dynamically created node. It is ABAP Web Dynpro Dynamic Programming. It simulates the behaviour of the SE16.

Web Dynpro ABAP , Dynamic Element Visibility, Read-only, Enabled Properties (PART 16)

$
0
0


This tutorial shows how you can play with the Properties of an UI Element in Web Dynpro. With the read only, enabled and visible.

Coding for ALV in Web Dynpro ABAP

$
0
0

Hi,


I thought to have a ready code and share with all, this will help anyone who is dealing with ALV in Web dynpro ABAP.

Please find the below working and tested code.
The code will allow you to change the description of the columns, Hide/display standard functions buttons, use standard function like adding etc. Have a look at the code below. Let me know in case of any further queries.


****ALV standard declarations

    DATA: LO_CMP_USAGE TYPEREFTO IF_WD_COMPONENT_USAGE,
          LO_INTERFACECONTROLLER TYPEREFTO IWCI_SALV_WD_TABLE,
          LV_VALUE TYPEREFTO CL_SALV_WD_CONFIG_TABLE.

    DATA: LR_COLUMN_SETTINGS TYPEREFTO IF_SALV_WD_COLUMN_SETTINGS,
          LR_COLUMN          TYPEREFTO CL_SALV_WD_COLUMN,
          LR_COLUMN_HEADER   TYPEREFTO CL_SALV_WD_COLUMN_HEADER.

    DATA: LT_COLUMNS TYPE SALV_WD_T_COLUMN_REF,
          LS_COLUMNS TYPE SALV_WD_S_COLUMN_REF.

    DATA: LR_STANDARD_FUNCTIONS  TYPEREFTO IF_SALV_WD_STD_FUNCTIONS.

    DATA: LR_ALV_HEADER TYPEREFTO CL_SALV_WD_COLUMN_HEADER,
          LR_ALV_CONFIG TYPEREFTO CL_SALV_WD_CONFIG_TABLE.

    DATA: LR_FIELD_AMNT TYPEREFTO CL_SALV_WD_FIELD.
    DATA: LR_FIELD TYPEREFTO CL_SALV_WD_FIELD.

    DATA: LV_AGGR_RULE   TYPEREFTO CL_SALV_WD_AGGR_RULE.
    DATA: LR_SORT_RULE   TYPEREFTO CL_SALV_WD_SORT_RULE.


****create ALV component

    LO_CMP_USAGE =   WD_THIS->WD_CPUSE_ALV_COMP( ).
    IF LO_CMP_USAGE->HAS_ACTIVE_COMPONENT( ) ISINITIAL.
      LO_CMP_USAGE->CREATE_COMPONENT( ).
    ENDIF.

****set data

    LO_INTERFACECONTROLLER = WD_THIS->WD_CPIFC_ALV_COMP( ).

****ref to if_wd_context_node

    LO_INTERFACECONTROLLER->SET_DATA(
      R_NODE_DATA =  LO_ND_CTX_VN_PLAN_OUPUT
    ).

    LV_VALUE = LO_INTERFACECONTROLLER->GET_MODEL(
    ).

****implement standard functions and initializaton

    LV_VALUE->IF_SALV_WD_TABLE_SETTINGS~SET_MULTI_COLUMN_SORT( VALUE = ABAP_TRUE ).

    LR_STANDARD_FUNCTIONS ?= LV_VALUE.
    LR_STANDARD_FUNCTIONS->SET_EXPORT_ALLOWED( ABAP_TRUE ).
    LR_STANDARD_FUNCTIONS->SET_PDF_ALLOWED( ABAP_FALSE ).
    LR_STANDARD_FUNCTIONS->SET_EDIT_CHECK_AVAILABLE( ABAP_FALSE ).
    LR_STANDARD_FUNCTIONS->SET_EDIT_INSERT_ROW_ALLOWED( ABAP_FALSE ).
    LR_STANDARD_FUNCTIONS->SET_EDIT_DELETE_ROW_ALLOWED( ABAP_FALSE ).
    LR_STANDARD_FUNCTIONS->SET_EDIT_APPEND_ROW_ALLOWED( ABAP_FALSE ).
    LR_STANDARD_FUNCTIONS->SET_VIEW_LIST_ALLOWED( ABAP_TRUE ).
    LR_STANDARD_FUNCTIONS->SET_FILTER_FILTERLINE_ALLOWED( ABAP_TRUE ).
    LR_STANDARD_FUNCTIONS->SET_DIALOG_SETTINGS_ALLOWED( ABAP_TRUE ).
    LR_STANDARD_FUNCTIONS->SET_COLUMN_SELECTION_ALLOWED( ABAP_TRUE ).
    LR_STANDARD_FUNCTIONS->SET_AGGREGATION_ALLOWED( ABAP_TRUE ).
    LR_STANDARD_FUNCTIONS->SET_GROUP_AGGREGATION_ALLOWED( ABAP_TRUE ).
    LR_STANDARD_FUNCTIONS->SET_COUNT_RECORDS_ALLOWED( ABAP_TRUE ).
    LR_STANDARD_FUNCTIONS->SET_HIERARCHY_ALLOWED( ABAP_TRUE ).
    LR_STANDARD_FUNCTIONS->SET_SORT_HEADERCLICK_ALLOWED( ABAP_FALSE ).
    LR_STANDARD_FUNCTIONS->SET_SORT_COMPLEX_ALLOWED( ABAP_TRUE ).

****configure columns & column funtions

    LR_COLUMN_SETTINGS ?= LV_VALUE.
    LT_COLUMNS = LR_COLUMN_SETTINGS->GET_COLUMNS( ).

****setting column header for all display feilds

    LR_COLUMN = LV_VALUE->IF_SALV_WD_COLUMN_SETTINGS~GET_COLUMN( 'AUFNR' ).
    LR_ALV_HEADER = LR_COLUMN->GET_HEADER( ).
    LR_ALV_HEADER->SET_DDIC_BINDING_FIELD( IF_SALV_WD_C_DDIC_BINDING=>DDIC_BIND_NONE ).
    LR_ALV_HEADER->SET_TEXT( 'PO No').
    LR_ALV_HEADER->SET_HEADER_TEXT_WRAPPING( ABAP_TRUE ).

    LR_COLUMN = LV_VALUE->IF_SALV_WD_COLUMN_SETTINGS~GET_COLUMN( 'ATWRT_LEN' ).
    LR_ALV_HEADER = LR_COLUMN->GET_HEADER( ).
    LR_ALV_HEADER->SET_DDIC_BINDING_FIELD( IF_SALV_WD_C_DDIC_BINDING=>DDIC_BIND_NONE ).
    LR_ALV_HEADER->SET_TEXT( 'Order Length(Mtr)').
    LR_ALV_HEADER->SET_HEADER_TEXT_WRAPPING( ABAP_TRUE ).

    LR_COLUMN = LV_VALUE->IF_SALV_WD_COLUMN_SETTINGS~GET_COLUMN( 'ATWRT_PLAN_QTY' ).
    LR_ALV_HEADER = LR_COLUMN->GET_HEADER( ).
    LR_ALV_HEADER->SET_DDIC_BINDING_FIELD( IF_SALV_WD_C_DDIC_BINDING=>DDIC_BIND_NONE ).
    LR_ALV_HEADER->SET_TEXT( 'Plan Qty').
    LR_ALV_HEADER->SET_HEADER_TEXT_WRAPPING( ABAP_TRUE ).   

LOOPAT LT_COLUMNS INTO LS_COLUMNS.

****hide fields such as CUOBJ, MATNR, AUFPL from display

      CASE LS_COLUMNS-ID.

        WHEN'CUOBJ'.

          LS_COLUMNS-R_COLUMN->SET_VISIBLE( IF_WDL_CORE=>VISIBILITY_NONE ).

        WHEN'MATNR'.

          LS_COLUMNS-R_COLUMN->SET_VISIBLE( IF_WDL_CORE=>VISIBILITY_NONE ).

        WHEN'AUFPL'.

          LS_COLUMNS-R_COLUMN->SET_VISIBLE( IF_WDL_CORE=>VISIBILITY_NONE ).


      ENDCASE.

    ENDLOOP.

****set row count at initial display as 30 rows
****hide all empty rows

    LV_VALUE->IF_SALV_WD_TABLE_SETTINGS~SET_VISIBLE_ROW_COUNT( '30' ).
    LV_VALUE->IF_SALV_WD_TABLE_SETTINGS~SET_DISPLAY_EMPTY_ROWS( VALUE = ABAP_FALSE ).

  ENDIF.

Dynamically changing Text Area to display all input texts

$
0
0

Hi everyone,


Often when we need to print a Web Dynpro View, we can just use the browser's built-in printing method (Ctrl+P). Issue will arise if the contents in our Web Dynpro View are not fully displayed in the printed page. For example, an Text Edit that required us to scroll through to view all the contents.


To solve this problem, we may want to change the Text Edit dynamically to show all the text without scrolling. And yes, we will need to use Dynamic Programming to achieve this.


Before attempt to change the Text Edit size dynamically, we need to figure out how to derive the required size of the Text Edit such that all the text inside will be shown in Printing Mode.


So for example, our original content is like below screenshot:


Origin.png


Notice that there is a scroll bar and we won't be able to see all of the text when we print the page. Now let say we click on Resize button and we want the page to look like this.


Tobe.png


With this, we are able to print the page with all content displayed.


View.png

Look at Text Edit's properties, it seems that the unit of the cols is by "Number of Letter" and the unit of rows is literally "Number of Rows". From this we can derive how to calculate the rows needed to display text without scrolling:


Rows Needed = Length(Value in Text Edit) / Number of Columns + 1


We add 1 to make sure that there is no scrollable contents. And with this, our problem is solved.


Now we come to the coding part.


Dynamically changing UI elements in Web Dynpro can be done in the hook method WDDOMODIFYVIEW (before the View get rendered). So let say when we click on the Resize button, an Action will be triggered, in the Action, we set a flag states that we want to resize the UI. This chain of events will eventually reach WDDOMODIFYVIEW. And here is our code in WDDOMODIFYVIEW:


METHOD wddomodifyview .

 
DATA: lr_container      TYPE REF TO cl_wd_uielement_container,
             lt_ui_children 
TYPE cl_wd_uielement=>tt_uielement,
             lr_text_edit     
TYPE REF TO cl_wd_text_edit,
             lv_value         
TYPE string,
             lv_rows          
TYPE i,
             lv_val_len      
TYPE i,
             lv_cols           
TYPE i.

 
FIELD-SYMBOLS: <ls_ui> TYPE REF TO cl_wd_uielement.

 
IF first_time EQ abap_false AND wd_this->print_mode = abap_true.

   
"Get all UI elements in the root container
    lr_container ?= view
->get_element( 'ROOTUIELEMENTCONTAINER' ).
    lt_ui_children
= lr_container->get_children( ).

   
"Filter the ones that need to be tweaked in size
   
IF lt_ui_children IS NOT INITIAL.

     
LOOP AT lt_ui_children ASSIGNING <ls_ui>.
       

         CLEAR: lv_rows, lv_cols, lv_value, lv_val_len.

         "Down cast UI element to UI Text_Edit, skip the loop if it's not       
       
TRY.
            lr_text_edit ?= <ls_ui>
.
            lv_value
= lr_text_edit->get_value( ).
            lv_val_len
= STRLEN( lv_value ).
            lv_cols
= lr_text_edit->get_cols( ).
            lv_rows
= lv_val_len / lv_cols.
            lv_rows
= lv_rows + 1.

           
IF lv_rows > 5.
              lr_text_edit
->set_rows( lv_rows ).
           
ENDIF.

       
CATCH cx_sy_move_cast_error.
           
CONTINUE.
       
ENDTRY.
     
ENDLOOP.

   
ENDIF.
    wd_this
->print_mode = abap_false.

 
ENDIF.

ENDMETHOD.


The above code is just for demonstration in blog purposes, few thoughts for it:

- The code is generic enough to cover for all Text Edits in our Web Dynpro view

- We can also extend the logic to cover for resizing other UI elements

- We may want to set a default rows value and bind the rows properties of our Text Edit to it

- We should also cater for case when user want to return to original view

- There's no "INSTANCE OF" in ABAP


That's end of the blog.  Please comment and share if you know of other efficient method to print the Web Dynpro view.


Thanks much for reading. Cheers!

How to disable the document edit in Word control

$
0
0

Recently I am working on a customer project and one customer requirement is they do not want to the word document be editable in the word control.

That means all buttons and menus in toolbar should be disabled.


1.png


The first idea comes to my mind is the flag "enableReadWrite".


2.png


As documented in sap helpit can fulfill my help but unfortunately it is deprecated. Regardless of this warning I have a try and found it does not work indeed.

4.png

Then I am speculating that if the document uploaded is read only, it is for sure that the toolbar will be disabled. So the issue turns to that how could I mark the document to be read only on the fly during uploading.


Since word 2007 the format of MS office follows the so called "Open office" protocal whose specification could be found here.


if you change the file type extension from .docx to .zip and open it with WinRAR, you will find the document is actually a bundle of several single files ( called document part in SAP internal ). The editability is controlled within the file settings.xml.


6.png 


if you don't know the exact syntax, just google it. I use the explaination from this one in google:


Now the task is quite easy, just add the necessary xml tag into the document source code. You do not need to manually parse the document source code since SAP has already done this job. You can just reuse standard class CL_DOCX_DOCUMENT.


Since I need to insert the document protection node in "settings" node, a simple transformation is written for this. The magic is between line 18 and 21.


<xsl:stylesheet xmlns:xsl="http://www.w3.org/1999/XSL/Transform"  xmlns:mc="http://schemas.openxmlformats.org/markup-compatibility/2006" xmlns:o="urn:schemas-microsoft-com:office:office"

xmlns:r="http://schemas.openxmlformats.org/officeDocument/2006/relationships" xmlns:m="http://schemas.openxmlformats.org/officeDocument/2006/math" xmlns:v="urn:schemas-microsoft-com:vml" xmlns:w10="urn:schemas-microsoft-com:office:word"
xmlns:w="http://schemas.openxmlformats.org/wordprocessingml/2006/main" xmlns:w14="http://schemas.microsoft.com/office/word/2010/wordml" xmlns:sl="http://schemas.openxmlformats.org/schemaLibrary/2006/main" mc:Ignorable="w14" version="1.0">  <xsl:output encoding="UTF-8" indent="no" method="xml" omit-xml-declaration="no" version="1.0"/>  <!-- Match everything all nodes and attributes -->  <xsl:template match="@*|node()">    <xsl:copy>      <xsl:apply-templates select="@*|node()"/>    </xsl:copy>  </xsl:template>  <xsl:template match="w:settings">    <xsl:element name="w:settings">      <xsl:for-each select="@*">        <xsl:copy/>      </xsl:for-each>      <xsl:element name="w:documentProtection">        <xsl:attribute name="w:edit">readOnly</xsl:attribute>        <xsl:attribute name="w:enforcement">1</xsl:attribute>      </xsl:element>      <xsl:copy-of select="./*"/>    </xsl:element>  </xsl:template></xsl:stylesheet>


and find a proper place to call the transformation:


 DATA: lr_element   TYPE REF TO if_wd_context_element,         lv_file_data TYPE xstring,         lv_ret       TYPE i,         lx_temp      TYPE xstring,         lv_msg       TYPE string,         lt_parms     TYPE /ipro/tt_key_value_pair,         ls_parm      LIKE LINE OF lt_parms.   lr_element = me->wd_context->get_element( ).   CHECK lr_element IS NOT INITIAL.   lr_element->get_attribute( EXPORTING name = 'BINARY' IMPORTING value = lv_file_data ).   DATA(lo_docx) = cl_docx_document=>load_document( lv_file_data  ).   DATA(lo_main_part) = lo_docx->get_maindocumentpart( ).   DATA(lo_docx_settings) = lo_main_part->get_documentsettingspart( ).   DATA(lx_settings) = lo_docx_settings->get_data( ).   /ipro/cl_docx_utilities=>transform( EXPORTING  iv_input_xstring    = lx_settings                                   iv_transform_name  = '/IPRO/DOCXCC_PROTECT'                                   it_parameters      = lt_parms                        IMPORTING  ev_result          = lx_temp                                   ev_ret             = lv_ret                                   ev_message         = lv_msg  ).   lo_docx_settings->feed_data( lx_temp ).   DATA(lx_docx_package) = lo_docx->get_package_data( ).   lr_element->set_attribute( EXPORTING name = 'BINARY'  value = lx_docx_package ).


after that the tag will be there in settings.xml:


9.png


The word control before upload document looks like below, buttons and menus available:


10.png


After upload, menu and button are disabled. If you try to edit the document, there will be notifications in the right pane to give you a hint that is not possible.


11.png

Of course this solution does not work for lower version of MS word like word2003. Fortunately my customer has enough money and they are already using Office 2013 so I do not need to worry about it

mass processing in POWL

$
0
0

Summary: This article illustrates the possibility of doing mass processing in POWL


In one of my projects there was a requirement wherein the user should be able to process up to 5 different work orders/operations at the same time. These work orders will be selected from a power list(POWL) in portal. 

powl.png


The standard POWL behavior throws an error message on certain actions if more than one rows are selected. This behavior can be overridden by creating an implicit enhancement in the respective feeder class.


Feeder class


The feeder class is the central and the most important place while developing and modifying Power Lists. The feeder class includes the handling of actions initiated by the user while pressing a button.


How to find the feeder class used for your POWL. (reference http://scn.sap.com/thread/1983141 )


Method 1 : T-code  POWL_TYPE contains the Feeder class name assigned to the POWL type .

One can check the POWL type with description and find the feeder class associated with it and then put a break point in method IF_POWL_FEEDER~GET_OBJECT_DEFINITION of the feeder class and ensure that feeder class is correct.


Or Method 2:  Go to POWL_UI_COMP webdynpro component, navigate to MASTER_CONTENT view method tab .

In the ONACTIONREFRESH_CURRENT event in the method tab set a break point in the lr_model->refresh_current( ). Click the "Refresh" button from the POWL table of which you want to find the feeder class , you will get the POWL type inside the method ( variable name-  ms_current_query-type ). Now go to POWL_TYPE t-code and find the feeder class which is assigned to this POWL TYPE


Mass selection


Create an implicit enhancement at the end of the method IF_POWL_FEEDER~HANDLE_ACTION of your feeder class. Code snippet given below.


i_actionid  is the action for which you need to select more than one rows in POWL. In this example i_actionid='CONF' for the 'Enter Confirmation' button from the screenshot above.


The selected orders/operations are stored in a transaction table ZTI_PMCONF for the current logged in user.


ENHANCEMENT ZPMZCONF_POWL_CL.    "active version *

   
DATA ls_order_op type ZTI_PMCONF.

   
DATA ltt_powl_msg TYPE POWL_MSG_TTY.


IF lv_selected GT 5 AND i_action_index IS INITIAL AND mv_bp_version NE '10' AND i_actionid = 'CONF'.
         

          **  display error message "Select upto 5 rows only" if more than 5 work orders are selected in POWL

       
delete lt_powl_msg index 1.

        e_messages[]
= lt_powl_msg[].

        ls_powl_msg
-msgtype   = cl_rplm_qimt_co=>sc_error.

        ls_powl_msg
-msgid     = 'ZZPM'.

        ls_powl_msg
-msgnumber = '144'.

       
APPEND ls_powl_msg TO lt_powl_msg.

        e_messages[]
= lt_powl_msg[].


ELSEIF lv_selected <> 1 AND i_action_index IS INITIAL AND mv_bp_version NE '10' AND i_actionid = 'CONF'.

     ** suppress standard error message "Select one line only" to allow multiple line selections for this action


                  delete lt_powl_msg index 1.

                  e_messages[]
= lt_powl_msg[].


     **  delete all the previous user selections stored in the transaction table if any, this is also deleted immediately after the values are set in the application

       
DELETE FROM ZTI_PMCONF WHERE UNAME eq sy-uname.

       
COMMIT WORK.


DATA lv_tab TYPE sy-tabix.

        lv_tab
= 0.
     

        ** Loop through the number of selected lines
       
DO lv_selected TIMES.

         lv_tabix
= lv_tab + 1.

        
READ TABLE c_selected INTO ls_index INDEX lv_tabix.

        
READ TABLE c_result_tab INTO ls_result INDEX ls_index-tabix.


        ** Check if order is locked

       
CALL METHOD me->check_order_lock

         
EXPORTING

            iv_aufnr  
= ls_result-aufnr

         
IMPORTING

            e_messages
= ltt_powl_msg.


IF ltt_powl_msg IS NOT INITIAL.

         
LOOP AT ltt_powl_msg INTO ls_powl_msg.

           
APPEND ls_powl_msg TO lt_powl_msg.

         
ENDLOOP.

       
ENDIF.
       

       ** if there are no errors or no work orders are locked, save the selected work orders and operation in the database table ZTI_PMCONF

       
IF lt_powl_msg IS INITIAL.

          ls_order_op
-AUFNR ls_result-aufnr.

          ls_order_op
-VORNR = ls_result-vornr.

          ls_order_op
-UNAME = sy-uname.

         
INSERT INTO ZTI_PMCONF VALUES ls_order_op.

         
clear ls_order_op.

       
ENDIF.

          lv_tab
= lv_tab + 1.

     
ENDDO.


IF lt_powl_msg IS INITIAL.
    

      ** Get role id

         
IF i_applid = cl_rplm_qimt_co=>sc_applid_mt.

            lv_role_id
= cl_rplm_qimt_co=>sc_roleid_mt_compl_conf.

         
ELSE.

            lv_role_id
= cl_rplm_qimt_co=>sc_roleid_others.

         
ENDIF.


     ** Get POWL api

          cl_powl_runtime_services
=>get_powl_object_info_handle(

            RECEIVING

              ro_powl_object_info_handle
= lo_obj_info

           
EXCEPTIONS

              no_wdr_component          
= 1

             
OTHERS                     = 2 ).


IF sy-subrc = 0 AND lo_obj_info IS NOT INITIAL.

            lv_environment
= lo_obj_info->mv_client_environment.

         
ENDIF.

               ** The custom form developed for this requirement(not in scope of this article) can be accessed via second level navigation or from the POWL
                    worklist. It behaves differently in both cases, so to identify if it is called via second level navigation or via POWL, a parameter is passed which                     is read in the HANDLEDEFAULT method of the window


               ** set parameter POWL_FLAG to check if the application is being called via POWL or second level navigation


              ls_name_value
-key   = 'POWL_FLAG'.

              ls_name_value
-value = 'X'.

             
INSERT ls_name_value INTO TABLE lt_name_value.

              ls_powl_follow_up
-bo_system  = cl_rplm_qimt_co=>sc_system_erp.


IF lv_environment NE if_wd_application=>co_client_environment-nwbc.

                ls_powl_follow_up
-bo_name    = 'maintenance_order_confirmation'.

             
ELSE. "PFCG usage in NWBC

                ls_powl_follow_up
-bo_name    = 'maintenance_ord_conf'.

             
ENDIF.

              ls_powl_follow_up
-bo_op_name = 'create'.

              ls_powl_follow_up
-parameters = lt_name_value.


ENDIF.

     e_portal_actions
= ls_powl_follow_up.


*----------------------------------------------------------------------*
*- Return the message table
*----------------------------------------------------------------------*

  e_messages[]
= lt_powl_msg[].

ENDIF.


ENDENHANCEMENT.


Note: I tried using a singleton class for this approach instead of using a transaction table. However, the session is not retained across POWL and the custom application.


Enable filter line on ALV table on POWL application.

$
0
0

Summary:

Enable filter Line on table by default on POWL application.


Requirement:

In the standard behavior POWL will show filter on table after you click on filter link on the right hand top side of the table. With the same link we can show or hide the filter option on table.


But if we have a requirement to show the filter option on table by default, here is the solution for POWL or other webdynpro supported applications.


Solution: Steps to implement the solution:


1.png

This functionality exists in POWL_TABLE_COMP webdynpro component.


Go to POWL_TABLE_COMP à Navigate to view à Method : DO_HOUSEKEEPING


2.png


Now implement overwrite exist enhancement to this method as follows.


Click on respective button under overwrite column.


3.png

And click on Enhancement button.


4.png


Now create enhancement as below.


5.png


Every time you do modification always recommended to use the same enhancement for the one functionality chance.


Now go to overwrite page and copy of all code from the original method. And go to overwrite method and copy all the code.


Now trace/debug for exact location to implement your functionality. In this case copy the below code after line no: 42.


lr_alv_model->if_salv_wd_std_functions~set_filter_filterline_allowed( abap_true ).
     lr_alv_model
->if_salv_wd_std_functions~set_filter_complex_allowed( abap_true ).

    
IF first_time IS NOT INITIAL.
       cl_salv_wd_model_table_util
=>if_salv_wd_table_util_funcs~set_functions_visible(
          r_model
= lr_alv_model
          
VALUE = cl_wd_uielement=>e_visible-none ).
    
ELSE.
       cl_salv_wd_model_table_util
=>if_salv_wd_table_util_funcs~set_functions_visible(
          r_model
= lr_alv_model
          
VALUE = cl_wd_uielement=>e_visible-visible ).
    
ENDIF.


Now execute the POWL and we can see the filter line on the table for all queries.


6.png


KEEP SHARING

Venky


How to check if fields are required in ABAP

$
0
0

Hello everyone,


in my first post I would like to present a way to check if required fields are filled. Below you will find data declaration, that will be used:


   DATA: l_node TYPE REF TO if_wd_context_node,
              l_attr_list TYPE cl_wd_dynamic_tool=>t_check_mandattr_tab,
              l_attr TYPE cl_wd_dynamic_tool=>t_check_mandattr_struct,
              l_has_errors TYPE wdy_boolean.


Reference to node (l_node) which attributes will be checked, list of attributes (l_attr_list) and a flag (l_has_errors) to indicate if check was with errors.


The next step is to fill list with attribute name(s):


  l_attr-node_path = wd_this->wdctx_pmb_md_edit.
  l_attr-element_index = -1.
  l_attr-attribute_name = 'KTEXT'.
  APPEND l_attr TO l_attr_list.


*here more attributes can be filled if needed

*check for required fields


   l_has_errors = cl_wd_dynamic_tool=>check_mandatory_attributes(
      attribute_list   = l_attr_list
      display_messages = abap_true
      context_root     = wd_context ).


  IF l_has_errors EQ 'X'.
    EXIT.
  ENDIF.


I hope you will find it useful.


Best regards,

Paul

How to get data from a dynamic node in Webdynpro ABAP ?

$
0
0

Hi,


I have come across many scn threads which refer to "How to read / get data from a dynamic node" .


Here I would like to demonstrate, the steps to read the data from a node ( either static / dynamic node ) in Webdynpro ABAP.


I have divided the task into 3 methods

  1. GET_NODE_INFO( ) - Get node information from node name
  2. GET_NODE_DATA_TYPE( ) - Get node data type & attribute list by using node reference ( if_wd_context_node )
  3. GET_DATA( ) - Get data of any given node reference


Now, let us look into the code of each method as below


GET_NODE_INFO( )


Parameters:


ParameterTypeRef ToOptionalAssociated TypeDescription
ID_NODE_NAMEImportingSTRINGNode Name
IO_PARENT_NODEImportingCheckedYesIF_WD_CONTEXT_NODEParent Node Reference
EO_NODE_INFOExportingCheckedIF_WD_CONTEXT_NODE_INFONode info reference
ED_ERROR_MESSAGEExportingSTRINGerror message
EO_NODEExportingCheckedIF_WD_CONTEXT_NODENode reference


Logic:


METHOD get_node_info .
  DATA:    lo_node_info    TYPE REF TO if_wd_context_node_info,
           lo_parent_node  TYPE REF TO if_wd_context_node,
           lv_node_name    TYPE string,
           lx_root         TYPE REF TO cx_root.

  TRY.
      "=============================================
      " check if node name is supplied,
      " if so nothing do , return the control
      "=============================================
      IF id_node_name IS INITIAL.
        RETURN.
      ELSE.
        lv_node_name = id_node_name.
        TRANSLATE lv_node_name TO UPPER CASE.
      ENDIF.

      "=============================================
      " Check if io_parent_node is not bound, if so
      " Assume parent node is WD_CONTEXT
      "=============================================
      IF io_parent_node IS NOT BOUND.
        lo_parent_node = wd_context.
      ELSE.
        lo_parent_node = io_parent_node.
      ENDIF.

      "=============================================
      "get node info
      "=============================================
      eo_node = lo_parent_node->get_child_node( name = lv_node_name ).


      eo_node_info = eo_node->get_node_info( ).

    CATCH cx_root INTO lx_root.
      ed_error_message = lx_root->get_text( ).
  ENDTRY.
ENDMETHOD.


----------------------------------------------------------


GET_NODE_DATA_TYPE( )


Parameters:

ParameterTypeRef ToOptionalAssociated TypeDescription
IO_NODE_INFOImportingCheckedIF_WD_CONTEXT_NODE_INFONode info Reference
ED_ERROR_MESSAGEExportingSTRINGError message
EO_DATAExportingCheckedDATANode data type ref
ET_FCATExportingLVC_T_FCATAttributes/fields list


Logic:


METHOD GET_NODE_DATA_TYPE .
  CLEAR:
      eo_data,
      et_fcat,
      ed_error_message.
  TRY .


      DATA:
            lo_table        TYPE REF TO data,
            ls_fcat         TYPE lvc_s_fcat,
            lt_attr         TYPE wdr_context_attr_info_map,
            ls_attr         LIKE LINE OF lt_attr,
            lx_root         TYPE REF TO cx_root.

      IF io_node_info IS NOT BOUND.
        ed_error_message = 'Node info is invalid'.
        RETURN.

      ENDIF.


      "=============================================
      " get attributes
      "=============================================
      lt_attr = io_node_info->get_attributes( ).

      LOOP AT lt_attr INTO ls_attr.
        CLEAR ls_fcat.
        ls_fcat-fieldname = ls_attr-name.
        ls_fcat-datatype = ls_attr-type_name.
        APPEND ls_fcat TO Et_fcat.

      ENDLOOP.

      cl_alv_table_create=>create_dynamic_table(
        EXPORTING
          it_fieldcatalog           = Et_fcat
          i_length_in_byte          = abap_true
        IMPORTING
          ep_table                  = lo_table
        EXCEPTIONS
          generate_subpool_dir_full = 1
          OTHERS                    = 2
      ).


      IF sy-subrc <> 0.
*       MESSAGE ID sy-msgid TYPE sy-msgty NUMBER sy-msgno
*                  WITH sy-msgv1 sy-msgv2 sy-msgv3 sy-msgv4.
      ENDIF.


      " if node is multiple ( 0..n / 1..n ) return table type
      IF io_node_info->is_multiple( ) EQ abap_true.
        eo_data = lo_table.
      ELSE.
        FIELD-SYMBOLS: <lt_table> TYPE STANDARD TABLE.
        ASSIGN lo_table->* TO <lt_table>.
        IF <lt_table> IS ASSIGNED.

          CREATE DATA eo_data LIKE LINE OF <lt_table>.

        ENDIF.
        " else, return the
      ENDIF.
    CATCH cx_root INTO lx_root.
      ed_error_message = lx_root->get_text( ).
  ENDTRY.
ENDMETHOD.


----------------------------------------------------------


GET_DATA( )


Parameters:

ParameterTypeRef ToOptionalAssociated TypeDescription
IO_NODEImportingCheckedIF_WD_CONTEXT_NODENode reference
ED_ERROR_MESSAGEExportingSTRINGError message
EO_DATAExportingCheckedDATAData
ET_FCATExportingLVC_T_FCATFields


Logic:


METHOD GET_DATA .


  DATA lv_count         TYPE i.
  DATA ls_fcat          TYPE lvc_s_fcat.
  DATA lv_index         TYPE i.
  DATA lv_attr_name     TYPE string.
  DATA lx_root          TYPE REF TO cx_root.

  FIELD-SYMBOLS: <lt_data> TYPE STANDARD TABLE,
                 <ls_data> TYPE any,
                 <lv_value> TYPE any.


  TRY.

      IF io_node IS NOT BOUND.
        ed_error_message = 'Node reference cannot be empty'.
        RETURN.
      ENDIF.


      " Get node data type and attribute list


     wd_this->get_node_data_type(
        EXPORTING
          io_node_info = io_node->get_node_info( )
        IMPORTING
          eo_data = eo_data
          et_fcat = et_fcat
          ed_error_message = ed_error_message
      ).


      " Return if any error or data type is not bound
      IF ed_error_message IS NOT INITIAL OR
         eo_data IS NOT BOUND.

        RETURN.
      ENDIF.


      ASSIGN eo_data->* TO <lt_data>.

      " get the no. of elements available in context node
      lv_count = io_node->get_element_count( ).

      " do for each element
      DO lv_count TIMES.

        " collect index value
        lv_index = sy-index.

        " Create a blank line and get the ref into <ls_dat>
        APPEND INITIAL LINE TO <lt_data> ASSIGNING <ls_data>.
        " return if line type is not assigned
        IF <ls_data> IS NOT ASSIGNED.
          RETURN.
        ENDIF.

        " Loop over each field/attribute and get the data
        LOOP AT et_fcat INTO ls_fcat.

          ASSIGN COMPONENT ls_fcat-fieldname
          OF STRUCTURE <ls_data> TO <lv_value>.

          IF <lv_value> IS ASSIGNED.
            lv_attr_name = ls_fcat-fieldname.

            io_node->get_attribute(
              EXPORTING
                index = lv_index
                name  = lv_attr_name
              IMPORTING
                value = <lv_value>
            ).
          ENDIF.

        ENDLOOP.

      ENDDO.

    CATCH cx_root INTO lx_root.
      ed_error_message = lx_root->get_text( ).
  ENDTRY.
ENDMETHOD.


----------------------------------------------------


Example:


Scenario: Let us say we need to read data from a node "NODE_DYN".


--------------------------

" Data declarations


DATA: lo_data TYPE REF TO data.
DATA lo_node TYPE REF TO if_wd_context_node.


FIELD-SYMBOLS: <lt_data> TYPE STANDARD TABLE.


     " Get node information


      wd_this->get_node_info(
        EXPORTING
          id_node_name     = 'NODE_DYN'
*      io_parent_node   =
        IMPORTING
*      eo_node_info     = LO_NODE_INFO
          eo_node          = lo_node
*      ed_error_message =
      ).


     " Get the data from context node


     wd_this->get_data(
        EXPORTING
          io_node          = lo_node
        IMPORTING
          eo_data          = lo_data
*     et_fcat          =
*     ed_error_message =
      ).


     " assign data into dynamic table


      ASSIGN lo_data->* to <lt_data>.

--------------------------


The internal table <lt_data> contains the data of our node "NODE_DYN"

Step by step about how to develop user defined value help

$
0
0


For input attribute totally five input help mode could be selected. In most of time we would always like to leverage the existing dictionary search help defined in DDIC. However if existing one could not fulfill our requirement, we have to develop our own value help by ourselves.

http://farm6.staticflickr.com/5492/11335713166_6e345e0939_o.png


I have used a simple example to demonstrate how to use "Freely Programmed" input help mode.

I have one consumer component ZCONSUMER, and one component ZUSER_HELP.
ZCONSUMER just have one input field for post ID and post description. When click value help of Post ID, the view of ZUSER_HELP will be opened and there is a SQL select to fetch the description according to post ID from database table.


http://farm8.staticflickr.com/7369/11335713086_6a508d0bef_o.png

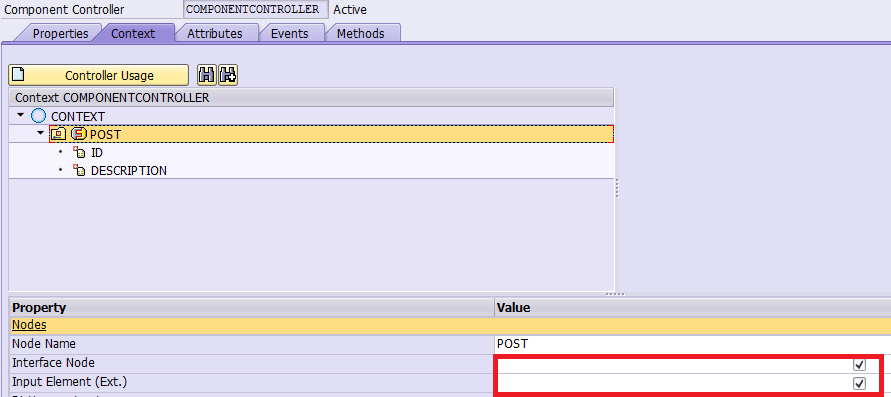
1. in ZUSER_HELP, create the context node with attribute ID for post id, and description for post description. Since I use external mapping for data transfer from consumer component to value help provider component, so I mark the flag "Input Element(Ext.)". Define the node as interface node.


http://farm8.staticflickr.com/7428/11335780363_2e56ff9e0a_o.png

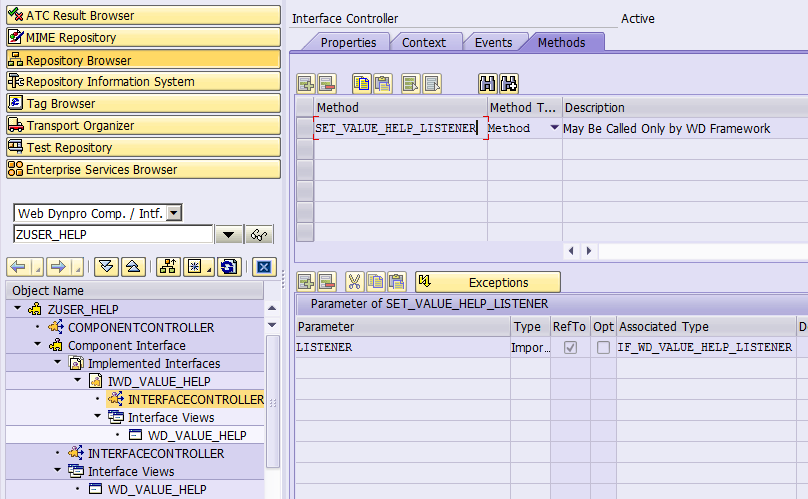
2. Implement the standard component interface IWD_VALUE_HELP. Redefine the method SET_VALUE_HELP_LISTENER. Also include your own value help view into the interface view WD_VALUE_HELP.

http://farm6.staticflickr.com/5503/11335642695_ba0efd36b4_o.png

In the method SET_VALUE_HELP_LISTENER, I select the post description from database table and store it to attribute DESCRIPTION.
The listener reference is also stored into member variable of component controller for later usage.

method SET_VALUE_HELP_LISTENER .   data: lv_id type socialdata-internal_id,         lv_text type socialdata-socialposttext.   wd_this->mr_listener = listener.   data(lo_node) = wd_context->get_child_node( IF_COMPONENTCONTROLLER=>wdctx_post ).   CHECK lo_node IS NOT INITIAL.   lo_node->get_attribute( EXPORTING name = 'ID' IMPORTING value = lv_id ).   SELECT SINGLE socialposttext INTO lv_text from socialdata where internal_id = lv_id.   CHECK sy-subrc = 0.   lo_node->set_attribute( name = 'DESCRIPTION' value = lv_text ).
endmethod.

3. Draw a button in value help view to close the value help popup window once clicked. Just use the reference stored in step2 to close window.
method ONACTIONCLOSE .
  wd_comp_controller->mr_listener->close_window( ).
endmethod.


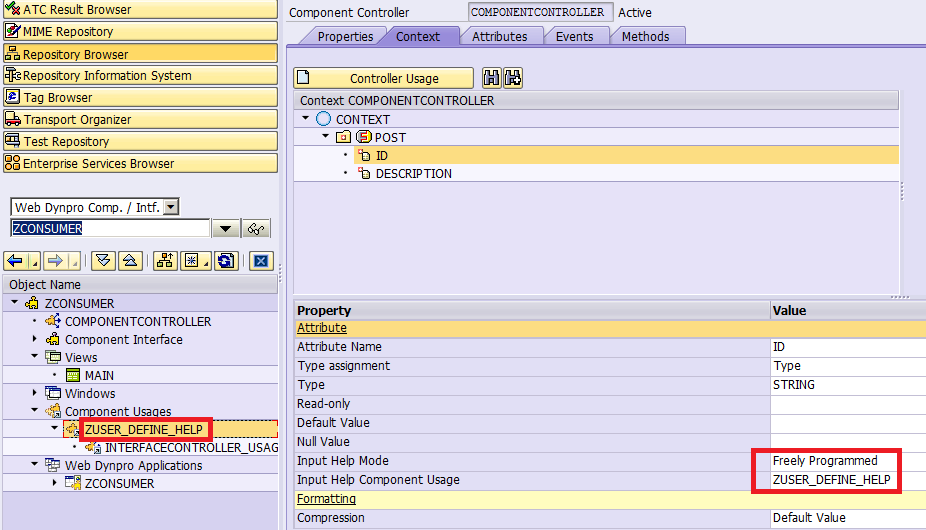
4. in consumer component ZCONSUMER, create component usage to ZUSER_HELP, and create context node POST. Choose Input help mode Freely Programmed and choose component usage ZUSER_DEFINE_HELP from value help.

http://farm3.staticflickr.com/2856/11335738714_8032846b54_o.png

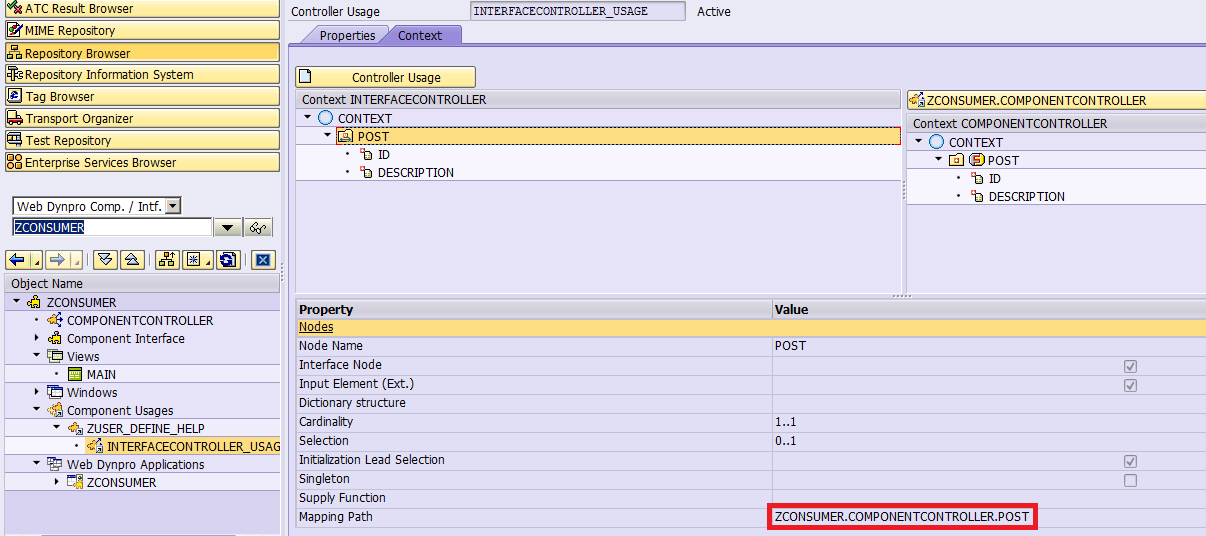
Create an interface controller usage on component usage ZUSER_DEFINE_HELP and finish the context node mapping, or else you will meet with runtime error

"External mapping of Node ZUSER_HELP#COMPONENTCONTROLLER.CONTEXT.POST is Not Completed yet".

http://farm6.staticflickr.com/5493/11335642515_1852cde887_o.png


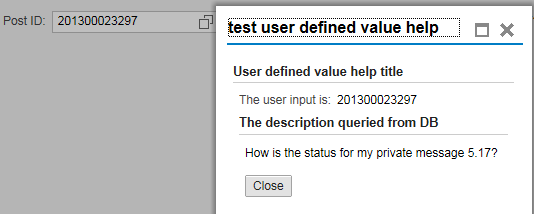
Now once clicked the value help icon of input field Post ID, the value help window provided by component ZUSER_HELP will pop up automatically.

http://farm8.staticflickr.com/7434/11335780243_5af7ea660a_o.png

And once close button is clicked, the description field of consumer component will be filled.

http://farm3.staticflickr.com/2858/11335738604_3bde2f0b4d_o.png

Step by Step to create UI elements and context node attribute in the runtime

$
0
0

I will use an example to demonstrate.The dynamically created elements are put into the red area below. Input the number of rows you want to dynamically generated and just create button to generate. Currently the content of text view is just filled with VALUE1,2,3,4... In next blog they will be filled with another approach by component usage cloning logic.

clipboard1.png

1. Create an empty group which acts as a container to hold all dynamically created ui elements.Specify layout as RowLayout.

clipboard2.png

2. Create an empty context node which also acts as a container for all dynamically created context node attributes.

clipboard3.png

3. In method WDDOMODIFYVIEW, just store the reference of view, which will be used later to manipulate UI elements after create button is clicked.

method WDDOMODIFYVIEW .

  CHECK first_time = 'X'.


  wd_this->mr_view = view.

endmethod.


4. create a new method in view controller.

In line 3 we get reference of place holder context node DYNAMIC. Then we get the node attributes by its node information object.

It is not necessary to create new attributes every time the create button is clicked unless the attribute has not really been created.

clipboard5.png

5. Implement the create button handler.

Make sure to delete all children of the UI place holder to avoid the repeated insertion of the ui elements with the same id, which will lead to runtime error. Then create new instance for label and text view, and specify their layout accordingly, so that each label will be put into a new line.


method ONACTIONCREATE .  CONSTANTS: cv_label TYPE string VALUE 'LABEL',             cv_field TYPE string VALUE 'FIELD',             cv_bind_text TYPE string VALUE 'DYNAMIC.VALUE'.  DATA: lv_count type i,        lo_container type ref to cl_Wd_uielement_container.  wd_context->get_attribute( EXPORTING name = 'NUMBER' IMPORTING value = lv_count ).  CHECK lv_count > 0.  create_context( lv_count ).  DATA(lo_root) = wd_this->mr_view->get_element( 'DYNAMICUI' ).  lo_container ?= lo_root.  lo_container->remove_all_children( ).  DO lv_count TIMES.    data(lv_field_id) = cv_field && sy-index.    data(lv_label_id) = cv_label && sy-index.    data(lv_bind_path) = cv_bind_text && sy-index.    DATA(lo_text_view) = cl_wd_text_view=>new_text_view( id = lv_field_id bind_text = lv_bind_path ).    DATA(lo_label) = cl_wd_label=>new_label( id = lv_label_id label_for = lo_text_view->id text = lv_label_id ).    CL_WD_ROW_HEAD_DATA=>new_row_head_data( element = lo_label ).    cl_wd_row_data=>new_row_data( element = lo_text_view ).    lo_container->add_child( the_child = lo_label ).    lo_container->add_child( the_child = lo_text_view ).  ENDDO.
endmethod.
Viewing all 107 articles
Browse latest View live


<script src="https://jsc.adskeeper.com/r/s/rssing.com.1596347.js" async> </script>